SmileBrilliant! is a national dental lab designed to help their customers receive professional strength teeth whitening without ever visiting a dentist! Their lab was specifically created to curb the high cost of cosmetic teeth whitening that is charged at dental offices around the world.
SmileBrilliant! has grown to service thousands of clients each year. Their lab creates custom-fitted bleaching trays and professional strength bleaching gel. Many people are surprised to discover that it is actually the dental labs like us that do the work for many dentists (making the custom fitted trays and supplying the bleaching gel) for top cosmetic dentists who resell their work to their clients. They were determined to develop their process to cut out the ‘middle man’ and allow clients to have their teeth professionally whitened lab-direct with no dentist visit.
Below are the things I got first from SmileBrilliant to make my own impressions. You’ll see the process on how I did it below. Make sure that you guys or those people who wants to use this doesn’t have any teeth, gums or mouth problems. Check your dentists first if you have any problems, before using it for safety purposes.
Who can use the SmileBrilliant! Teeth Whitening System?
Anyone with teeth less than bright can benefit from the SmileBrilliant! Teeth Whitening System. Their system will not effect existing dental work and has shown to be highly effective on tobacco, coffee & tea, tetracycline, and various other teeth stains. SmileBrilliant’s 100% satisfaction guarantee makes everyone looking for a bright smile a candidate!
CLICK ME for FAQ’s about SmileBrilliant.
SCROLL DOWN TO READ MORE INFOS BELOW AFTER THE PHOTOS! =) ENJOY!


This is the Box I got from Smile Brilliant.
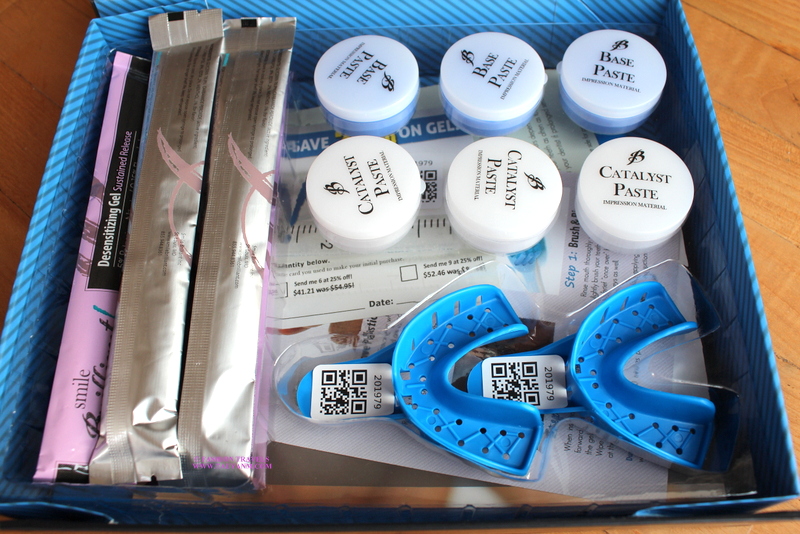
What’s inside the box are the complete things you needed to make your Impressions. Whitening Gels and Desensitizing Gels.


Below are the Step by Step Guide on how you make your perfect Impressions: You can check my photos above to check on how I did it. I will call the putty or the paste as “CLAY” so you guys can understand the materials much better like I did hahaha =D
- Prepare you Impression: Start by Brushing your teeth, Flossing thoroughly. Make sure that your teeth/mouth are super clean!
- Mix Catalyst & Base Paste: Mix catalyst & base paste together for like 45-60 seconds but mix it as fast as you can! Because they dry or harden up pretty quickly. The Clay should look like all coloured blue.
- Place Mixed Putty in the Tray: Once your Clay is all coloured blue put them quickly and evenly distributed on the blue tray provided. Do this for at least 30 seconds or as I say do all the steps as fast as you can!
- Make your Upper Impression: Place your Tray inside your mouth and make sure that it is position properly, Press the tray to your teeth in the middle of the clay as you can see on my photos above. Once you’ve place your upper teeth on the clay don’t move it or wiggle or don’t bite down as you will ruin the accurateness of the material. Do not remove the tray for about 2:00 or 2:30
- Repeat & Do all the steps above as fast as you can for your lower teeth. Make only one tray at a time! Don’t make both upper and lower at the same time as the clay will get hard before you can finish the whole process.
- Now, Let your 2 impressions sit for 10 minutes and then rinse under cool water.
- Mail Impressions Back to the Lab in the Address provided. SmileBrilliant provided an extra pack with the address included so you can just put your impressions inside the pack/mail plastic envelope and mail or send it back to them. You will then receive an email when they already receive your impressions and once everything is done, you will receive another mail that your whitening trays are ready!
The whole process was fast and accurate! They are very good in communicating with their costumers that you won’t regret trying their products. They will update you and answer all your questions very quick! I can’t say any bad side from their service. Must remember that the time of delivery is all depends on how far is your country to theirs, or how fast or slow the courier will send it back and forth to you. Coz it took at least 10 days for them before they received my impressions because that is the fastest way I can send it to them from here in Malaysia. So don’t ever blame the service if you think it is so long before they can send it back to you. Because we all have our faults so you just have to remember that.
I already have my whitening trays with me here. But I haven’t tried it yet since I have to go out more often for another week because my mother in law is here and it is her first time in malaysia so currently I am a tourist guide till last week of August. I will be giving my best to give you guys a very honest and clear review about the product on the second week of September. I will start using the whitening trays on the first week and take photos each day so you guys can see and compare the difference. and Of course to see if it is really effective right? Till next time! x0~ jane 😉

?**********?**********?**********?**********?**********?**********?**********?**********?**********?
LIKE MY PAGE ON FB >> TWITTER >> INSTAGRAM >> PINTEREST>>YOUTUBE>> BLOGLOVIN >> NETWORKEDBLOGS
I reviewed one of their products this past March and I really love these guys,…great company with great products!
I wonder if taking your moulds yourself is less stressful than going to the dentist to have them taken. Looking foward to the full test of the product.
Sounds like a pretty great product! I’ve been considering whitening my teeth. I need to look into this, thank you!
I think this is great. Not sure if it would work for me since when I had to get impressions at my dentist I had to get the childrens size since my mouth is smaller than the average person.
That sounds so much easier than I thought it was going to be. & thank you for the tip of doing one at a time, I totally would’ve tried to do them both.
This is suck a cool thing to do! I’ll have to check them out.
Wow, your instructions are so detailed which makes it look easy to use. I have fears of the dentist so this makes whitening my teeth an option for me. Thank you for sharing.
That looks pretty easy to use. You provided such great instructions. Thanks!
This sounds amazing and easy to use. I will have to look into this more. Thanks for sharing.
lol dentist at home! I hated those molds going to the dentist, not sure I’d to it myself at home but its certainly an option for those that want it!
My (grown) son has one of these kits. He loves it!
What a neat product! Sounds pretty easy and straightforward. May have to look into this.
Sounds relatively easy to do! I have found that just not drinking dark liquids (soda, coffee, etc) works wonders for my teeth!
This sounds really interesting. My teeth could use some whitening. Can’t wait to see your results. Thanks for sharing!
I totally need to whiten my teeth. I need to look into this more.
I’ve been looking for an effective system for a while now. Thank you!
O.k. this is brilliant. I really need to do this. I got my braces off last year and I have promised myself I would get m y teeth whitened. I’ll be looking into this for sure.
I so wish I could do this, but my teeth are too sensitive. I’d do it in a second if I could though.
This just reminded me that I really need to do this. What a great product this sounds like! I have to do this soon!
Cool! I can’t wait to see your before and after pictures! I definitely would like a more cost efficient whitening treatment for my teeth.
Thanks for sharing! I definitely need to whiten my teeth–soon!
That looks like a really cool product. Easy to use too.
These Look Really Cool Would Love To Try These Great Review Must Get A Set Thank You!
Sounds like a great and easy product to use at home. Much better than going to the dentist.
I think being able to whiten your teeth at home is more cost effective. I have got to try this product!
I love how easy Smile Brilliant makes this to do from your own home! What a great product to try for teeth whitening.